Roles + Responsibilities
Role:
-
Programmer
-
VFX Artist
-
Designer
Responsibilities:
-
Design and implement core game systems and architecture
-
Iterates the mechanic based on player test feedback
-
Player movement and weapons
-
All aspects of Visual Feedback, including VFX and HUD elements
-
Lighting
-
Implement scene load structure
-
Animator structure setup
-
Optimization
High Concept
GlitchHop is a fast-paced first-person bullet-hell shooter. You play as Anikah, a deadly humanoid weapon deployed on a massive space station that is corrupted by a AI hivemind. Armed with 3 energy weapons built for different combat situations, stay in constant motion and dodge waves of enemy bullets, stay alive, destroy the hivemind!
Background + Project Goal
The game is my final project when I was in Vancouver Film School as a student. The goal is to create a 10-minute polished gameplay experience in 5 months ( Jun 2025 - Nov 2025) as a team of 5 using Unity Engine.
Programming
Player Advance Movements
GlitchHop is a fast-paced bullet hell shooter. Players need to be on the constant move to survive. The movement mechanic includes: Dash / Slide / Double Jump/ Coyote Jump, these movements not only need to be responsive but also bug free to avoid any player frustration.
To ensure reliability, I designed the movement system around clear state logic and layered condition checks, accounting for the wide range of situations players may encounter during gameplay.
SlowMo Mechanic
Two of the game’s core pillars are constant movement and precise aiming. During early playtests, we identified a conflict between these pillars: players had little incentive to stay mobile when trying to aim precisely, especially in intense combat.
To solve this, I designed and implemented a slow-motion mechanic that triggers after specific action combos.. Giving players small windows of time to react and line up precise shots, which incentivizes aggressive movement. This mechanic reinforces 2 pillars, and ultimately became one of the game’s most fun and distinctive features.
Weapon's Feel
GlitchHop has 3 types of weapons: SMG, Shotgun, and Sniper. I implemented camera shake and a procedural recoil pattern to give players a distinct gun feel while being "satisfying" equally.
On each shot, the camera is rotated along the X, Y, and Z axes by a randomized offset within specific bounds.
The perceived sharpness of the recoil is further controlled by the rotation interpolation speed, which directly affects how snappy or heavy the camera response feels.
The system created a unique recoil profile for each gun, tighter and faster patterns for the SMG, wider and heavier kicks for the shotgun, and sharp, high-impact recoil for the sniper.
Calculate the target rotation of recoil

The RecoilFire() is called whenever the gun fires. The recoil rotation values are randomized along the X, Y, and Z axes.
I also separated the variables for Slow-Mo, ADS, and HipFire, which are all scriptableObjects, allowing designers to tweak how the gun behaves in different scenarios easily using this data editor I created.
In Update(), the targetRotation will always lerp to 0, which is the natual "Pull" to normal position.

Cinemachine Rotation
Finally, rotate the camera through cinemachine.PanAxis / TiltAxis/ Dutch which corrsponding to the x , y , z axis.
And the final camera rotation = mouse input value + the recoil value
Enemy Colliders ( Ragdoll Collider + Hitbox )


Enemy Death RagDoll
Before Milestone 3, we consistently received feedback that killing enemies didn’t feel satisfying enough, players expected more than just a standard death animation, and some expected the enemies to be sent flying when blasted up close with the shotgun. However, addressing this purely through animation would’ve been impractical, as it would require creating dozens of unique animations to make each death feel natural.
To solve this, I immediately thought of using ragdoll physics. I implemented a system where ragdolls are only applied when an enemy is killed. On top of that, I added dismemberment when the last shot from player has hit certain body parts. The feature remains purely visual, easy to decouple from gameplay systems while remaining scalable and maintainable.
The ragdoll setup is built using Character Joint components to physically link skeletal bones and define constraints, which have to be configured manually due to non- humanoid enemies.
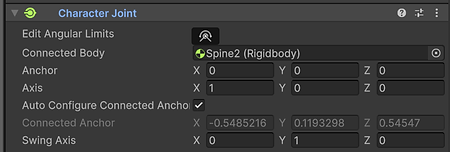


Ragdoll Code
Since the enemy is also controlled by an Animator, the ragdoll physics system would conflict with it. To resolve this, I disable the Animator and uncheck "Is Kinematic" for every bone’s Rigidbody when enabling ragdoll physics.
The player bullet force varies based on the bullet’s travel distance. I used an animation curve to make this relationship more visual and easier to tweak for balancing.
When applying force to the Rigidbody of got hit bodyparts, I used ForceMode.Impulse to create a stronger, more instantaneous “burst” effect.
Finally, if the got hit Rigidbody is a weak point, I lower its break force to ensure the body breaks apart at the designated weakpoint joint.

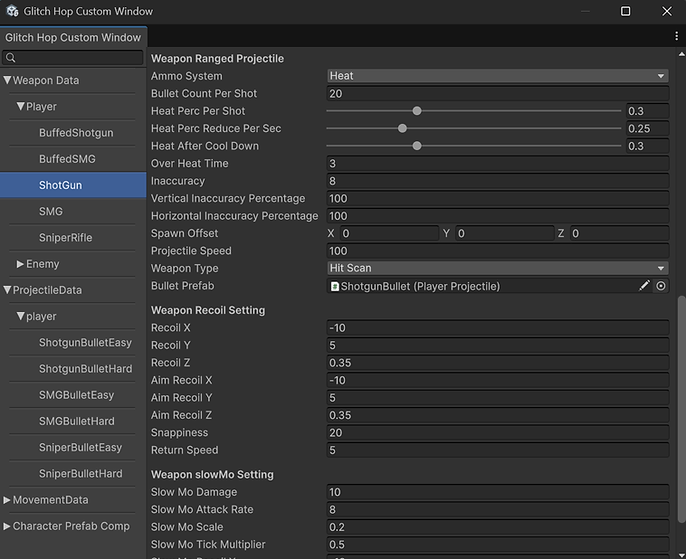
Tools - Data Editor
GlitchHop heavily relies on balancing. However, constantly searching for the right prefab and manually adjusting variables was a huge pain for the team and wasted a lot of time during the process.
To solve this, I created a custom data editor window using Odin Editor, allowing designers to easily tweak gameplay variables directly in the editor. This approach saved a significant amount of time and helped the team iterate much faster.
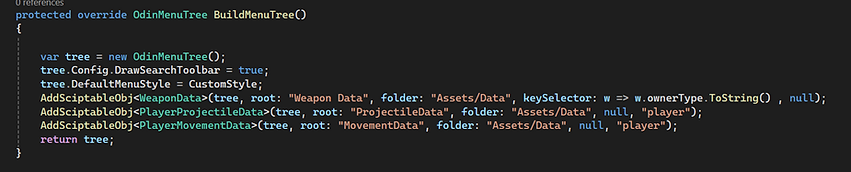
Build The Menu Tree
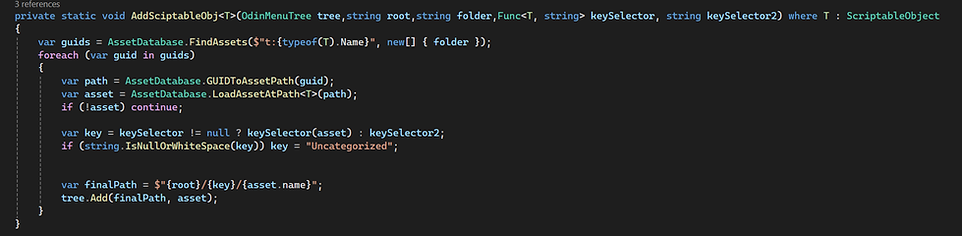
Function that adds scriptableObject to the tree
The BuildMenuTree function() will build the menu tree based on the class type and folder location, and the AddScriptableObj<T> function will add the ScriptableObject class to the menu tree.
Tools - Property Setter For VFX/Shader
During development, I frequently needed to drive VFX and shader properties dynamically. Since many materials share the same shaders, modifying global properties would unintentionally affect multiple assets. To solve this, I built a custom tool that allows me to adjust shader properties at runtime without creating duplicated materials.
In addition, I extended the tool to support editor-time preview, allowing property values to be modified and tested directly in the Editor without entering Play Mode. This greatly improved iteration speed and made visual tuning much more efficient.
The tool can also collect all mesh renderers under a parent root, eliminating the need to manually assign each renderer and save time. The property change function can be called from code or driven by event assets, making the system flexible for both programmers and designers.

Static Setting

Occlusion Culling
Optimization
GlitchHop has a decent amount of art assets. After milestone 3, when we put all the environment art assets in the game, we noticed a significant frame rate drop. The game was running at 20 - 30 fps, which is unacceptable for a fast-paced shooter game and will greatly harm the player experience if this issue persists. So I started to optimize the game through 2 approaches:
Occlusion Cuilling and Baked Lighting
Occlusion Culling
Occlusion Culling is a Unity optimization technique that prevents objects outside the camera’s visible area from being rendered. By eliminating unnecessary draw calls, it significantly improves performance, resulting in an estimated 50–70% performance gain for our game.
To implement this, I first marked all environmental assets as Static to allow them to participate in the occlusion system. Large structural elements such as walls and floors were configured as Occluders, while smaller objects like boxes, cables, and props were set as Occludees. Then defined the Occlusion Culling Areas to match the game’s playable spaces, ensuring accurate calculations within all accessible regions.
Lighting Bake
Lighting was another major performance bottleneck, primarily due to the cost of real-time shadow calculations, which update every frame. To address this, I changed the scene lighting from fully real-time to a pre-baked lighting workflow using Light Probe Volumes, significantly reducing per-frame lighting overhead.
All environmental lighting and shadows are baked and treated as Static, eliminating the need for continuous shadow recalculations. In contrast, enemy shadows remain Dynamic, allowing them to respond correctly to movement and position changes.

Environment is static, Movable Object is Dynamic


Light and Shadow Setting
Visual Feedback
My second role is VFX artist, I used the combination of Unity Shader and Unity Visual graph to create all the visual feedback for the GlitchHop. Here are some of the highlighted works.
Glitching Effect
The glitching effect does not influence gameplay mechanics directly; instead, it functions as a "cool" way for state transitions. Initially, it was implemented as a stylized method for despawning enemy corpses.
Later, I extended its use to weapon swapping as well. When combined with the slow-motion mechanic, it consistently creates a series of cool and memorable moments.
I used the Alpha Clipping node in Shader Graph to control which parts of the object disappear, and expose the disappearing progress as a parameter so it can be driven by code. On top of that, I applied vertex displacement to create the glitching feeling.

Barrier With Ripple Effect
The Barrier Ripple Effect serves as a visual feedback mechanism that clearly communicates the barrier’s ability to block incoming player projectiles.
The effect is driven by a combination of VFX Graph / Shader Graph and scripting. Upon impact, the projectile’s world-space hit position is transformed into the barrier’s local space and passed into the shader graph, allowing the ripple to originate precisely from the point of contact.
When the back of the thrust is close to the surface, the smoke will be created. I used the collider to trigger the property in the VFX graph, which toggles the smoke.
Charger Attack
The Charger enemy will charge at the player, and its attack loop will follow: Charge -> Attack -> CoolDown(Stun). So how to communicate to the player which state this enemy is in has been quite challenging for me. After many iterations, I use engine thrust,
Sphere attack and Smoke to show these 3 stages.
Gun OverHeat
During the playtest, players were often confused about why the weapon could not fire, revealing that the overheating mechanic lacked clear visual communication. I resolved this by using smoke, heat distortion, and a red-hot metal shader to indicate the overheating mechanic. Additionally, I made a ventilation effect with directional smoke velocity to show the "cool down" state to tell the player that the gun is not able to fire at the moment.
Gun Muzzle Flash
The muzzle flash was one of the first VFXs I created for GlitchHop. Initially, it was designed as a circular burst of fire, inspired by real life references. However, it created visual clutter and blocked the player’s view when aiming down sights. To fix this, I redesigned it into an “X”-shaped flash, which still provides strong visual feedback but less visual clutter.